Channel Manager windows reference
A complete reference to the Channel Manager interface windows. Each window opens from the View → Windows menu or with a keyboard shortcut.
Channel Manager main window
Information panel (top)
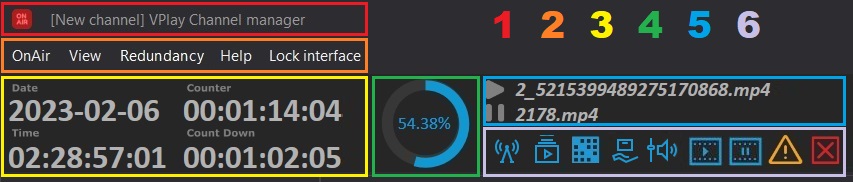
| Element | Description |
|---|---|
| Counter | Elapsed playback time counter for the current item |
| Count down | Countdown counter to the end of the current item |
| Circular diagram | Playback progress of the current item (as a percentage and graphically) |
| Item names | The currently playing and the next schedule item |
Information icons

| Icon | Meaning |
|---|---|
| Live OnAir | The channel is broadcasting from an external source |
| Playlist mode | Playlist mode is active |
| Schedule mode | Schedule mode is active |
| Manual Logo | The logo was turned on manually |
| Audio in Manual mode | Automatic audio normalization is disabled |
| Reserve clip in program | A reserve block is currently playing |
| Reserve clip in preview | A reserve block will play next |
| Warning (yellow triangle) | The schedule contains files with a format mismatch (they will be played and the broadcast will not be interrupted) |
| Error (red cross) | The schedule contains critical errors (missing files, etc.) |
Playback control buttons

| Button | Description |
|---|---|
| CUE | Prepare the selected item for playback (highlighted in orange). In Schedule mode, all items between the current and the selected one are deleted on transition (irreversible!). In Playlist mode, the transition is made without deleting the intermediate items |
| SKIP | Immediately jump to the position prepared with the CUE button |
| Switch to Playlist | Switch the channel to Playlist mode |
| Switch to Schedule | Switch the channel to Schedule mode |
OnAir Options window
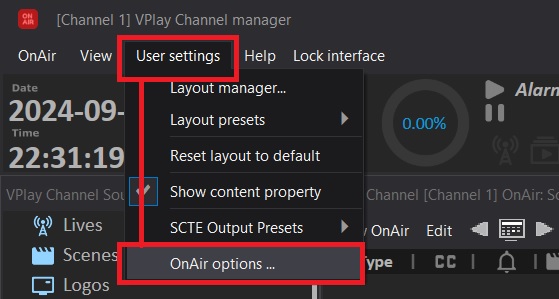
Opens from View → OnAir Options. It contains three tabs:
OnAir Options tab
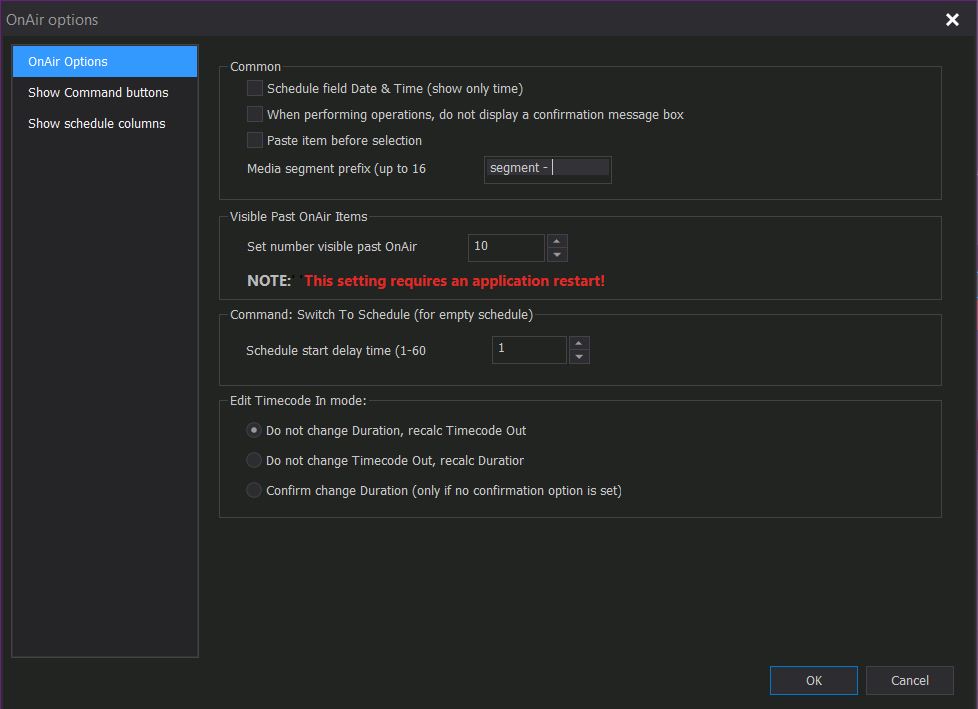
Common section:
| Parameter | Description |
|---|---|
| Schedule field Date & Time (show only time) | Hide the date and show only the item start time |
| When performing operations, do not display confirmation | Disable all confirmation windows (use with caution!) |
| Paste item before selection | Paste (Ctrl+V) above the selected item instead of below it |
| Media segment prefix | Prefix for segment numbering (up to 16 characters). If empty, no numbering is displayed |
Visible Past OnAir Items section: how many rows of the already played schedule to show (0–10000, default 10). Requires restarting Channel Manager.
Schedule start delay time section: delay before broadcast starts after a schedule is added (1–60 minutes, default 1 minute).
Edit Timecode In Mode section: behavior when Timecode In is changed:
- Do not change Duration, recalc Timecode Out — the duration is kept and Out is recalculated
- Do not change Timecode Out, recalc Duration — Out is kept and the duration is recalculated
- Confirm change Duration — ask for confirmation of the change
Show Command buttons tab
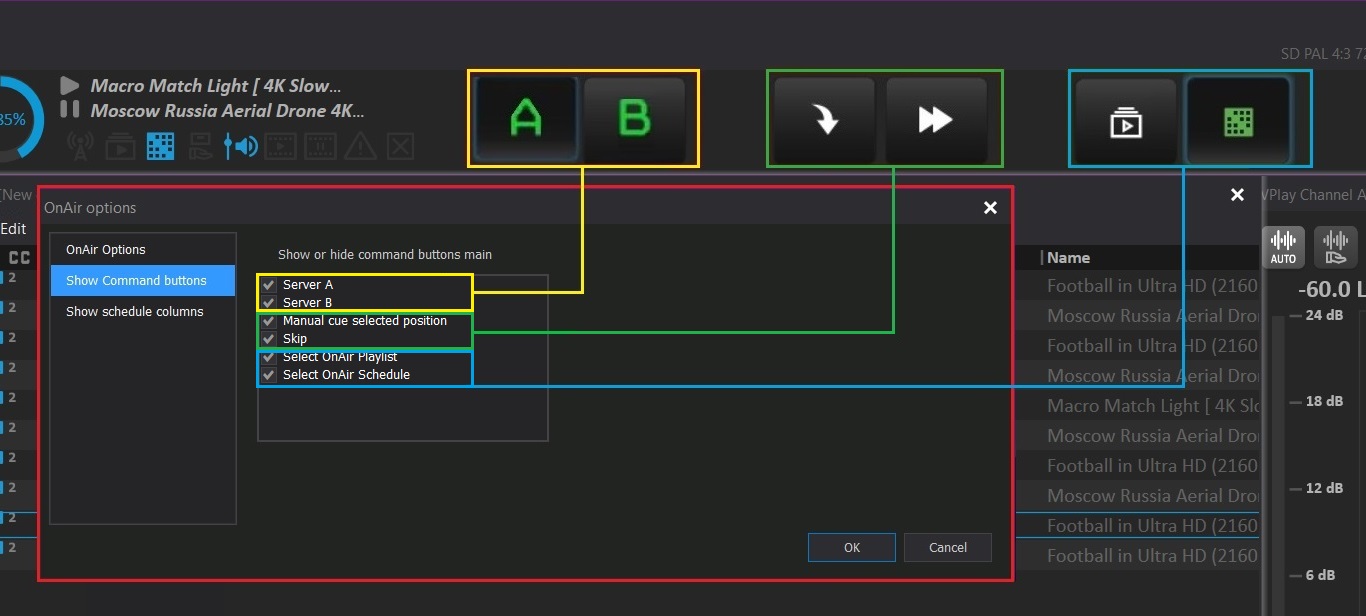
Enable or disable individual control buttons of the main window. All are enabled by default.
Show schedule columns tab
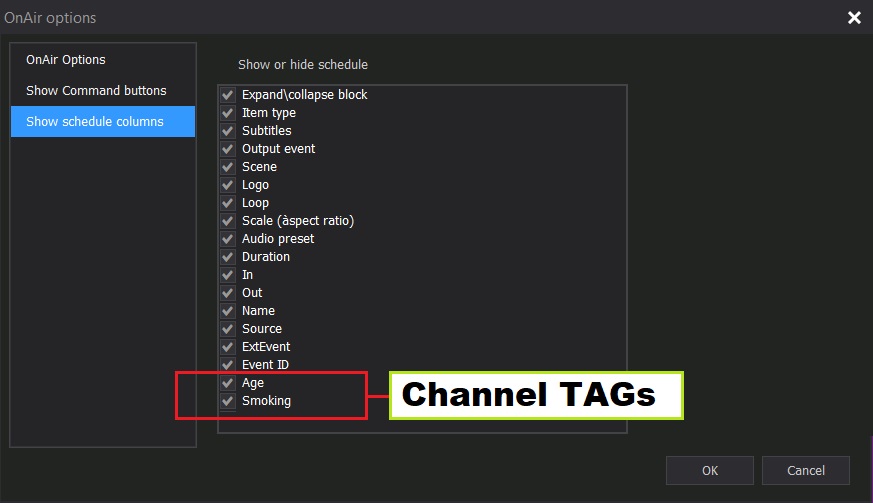
Enable or disable the OnAir schedule columns. The columns up to EventID are standard. The columns below it are custom channel tags.
Channel Source window (resource tree)
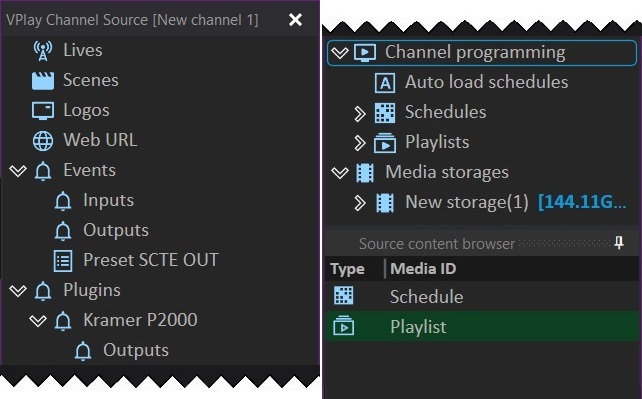
The resource tree on the left side of Channel Manager. Sections:
| Section | Contents |
|---|---|
| Lives | All live sources connected to the channel (Live + Web URL) |
| Scenes | *.vpScene files from the channel's service folder. Path: D:\Channel_Name\Scenes\1920x1080\ (cannot be changed) |
| Logos | Logo files. Path: D:\Channel_Name\Logo\1920x1080\ (cannot be changed) |
| Web URL | Web addresses added manually from Channel Manager |
| Events → Input | Input external events (SCTE-35 from the input stream) |
| Events → Output | Output external events (SCTE markers generated by VPlay) |
| Events → Preset SCTE OUT | Custom presets of output SCTE markers |
| Plugins | External devices and their presets (Video Router, GPI, etc.) |
| Channel Programming | The active Playlist and Schedule (highlighted in green — currently on air) |
| Channel Programming → Schedules | Storage for schedule files. Arbitrary *.xml names |
| Channel Programming → Playlists | Storage for playlist files. Arbitrary *.xml names |
| Channel Programming → Auto load Schedules | Auto-loaded schedules. The name must be in the year.month.day.xml format |
| Media Storages | Connected content storages with PAM |
Channel Programming context menu
- Open for edit — open in a separate Schedule Editor window
- Create new — create a new schedule/playlist
- Set as active playlist — make the selected playlist the active on-air playlist (Playlists only)
- Find, Remove, Rename, Cut, Copy, Paste — standard operations
Source Content Browser window
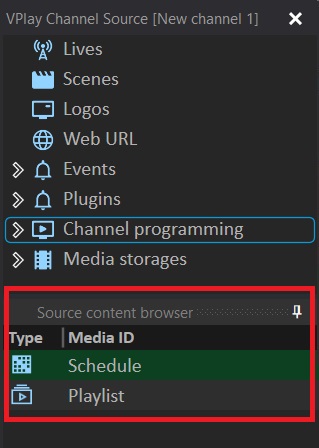
Displays the contents of the section selected in the resource tree.
Columns for the Media Storages section
| Column | Description |
|---|---|
| Type | Content type icon |
| Media ID | End-to-end identifier of the file (asset) |
| Duration | Media file duration |
Asset action buttons: - Asset + — create a new (empty) asset - Media — delete the media file (the asset metadata is kept) - Asset & Media — delete both the media file and the asset
Deletion protection
Media files that are in the active playlist cannot be deleted — the software protection returns an error.
Columns for the Scenes section
| Column | Description |
|---|---|
| Media ID | *.vpScene file name |
| Duration | Scene duration |
| Def. Layer | Default overlay layer (0 = not assigned) |
| Def. Duration | Automatically detected duration (based on the longest scene element) |
Content Property window
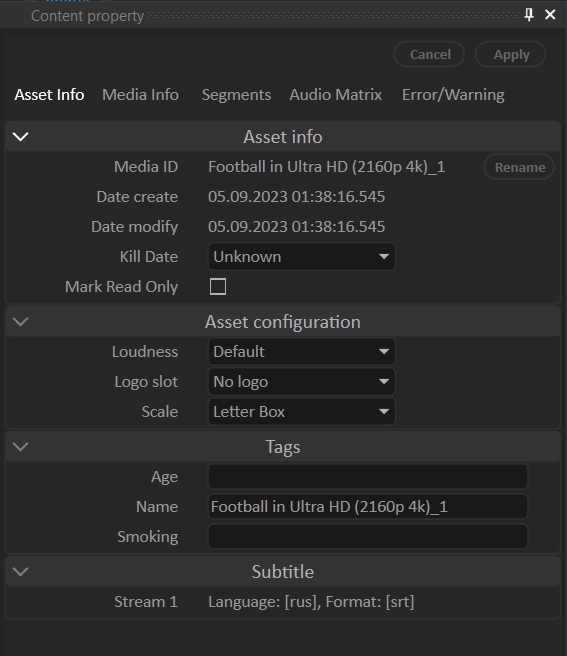
Properties of the item selected in Source Content Browser. To save changes, click Apply.
Asset Info tab
Asset Info section:
| Field | Description |
|---|---|
| Media ID | File identifier (read-only) |
| Date create / Date modify | Creation and modification dates |
| Kill Date | Date when the asset is automatically deleted from storage |
| Mark Read Only | Lock all editable asset fields |
Asset configuration section:
| Field | Description |
|---|---|
| Loudness | Default audio preset for this asset |
| Logo slot | Default logo slot |
| Scale | Default scaling mode: No scale, LetterBox, Anamorph, Pan & Scan |
Tags section: up to 10 custom tags (max 255 characters each).
Subtitle section: information about the available subtitle tracks.
Rename button: renames the asset AND the corresponding physical file. Previous occurrences in schedules become erroneous.
Media Info tab
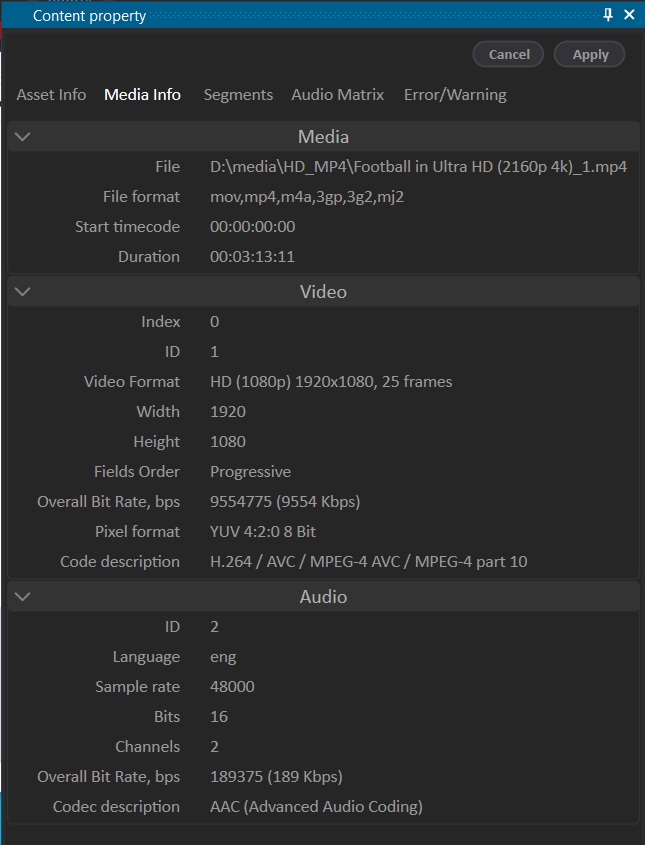
Full technical characteristics of the file: location, format, start timecode, duration, and video and audio stream parameters.
Segments tab
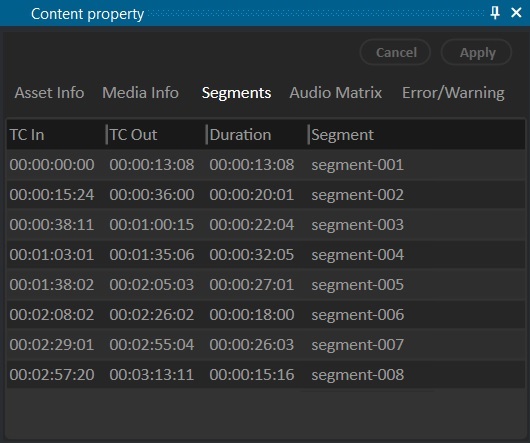
List of segments the asset is divided into. Segment numbering (if enabled via OnAir Options → Media segment prefix).
Audio Matrix tab
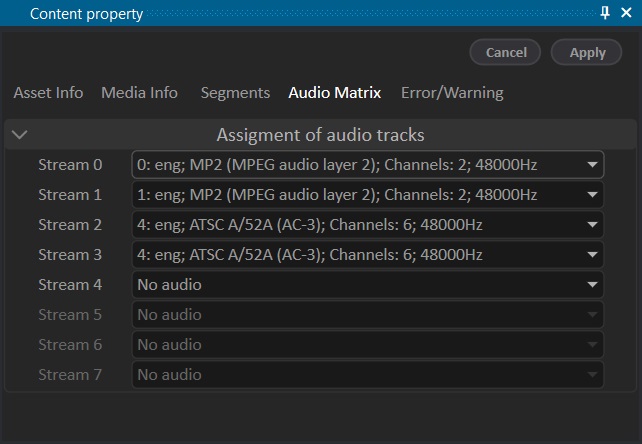
Audio track playback settings: you can disable individual tracks or all audio (No audio).
Error/Warning tab
Errors and warnings about mismatches between the file parameters and the channel settings.
OnAir schedule columns
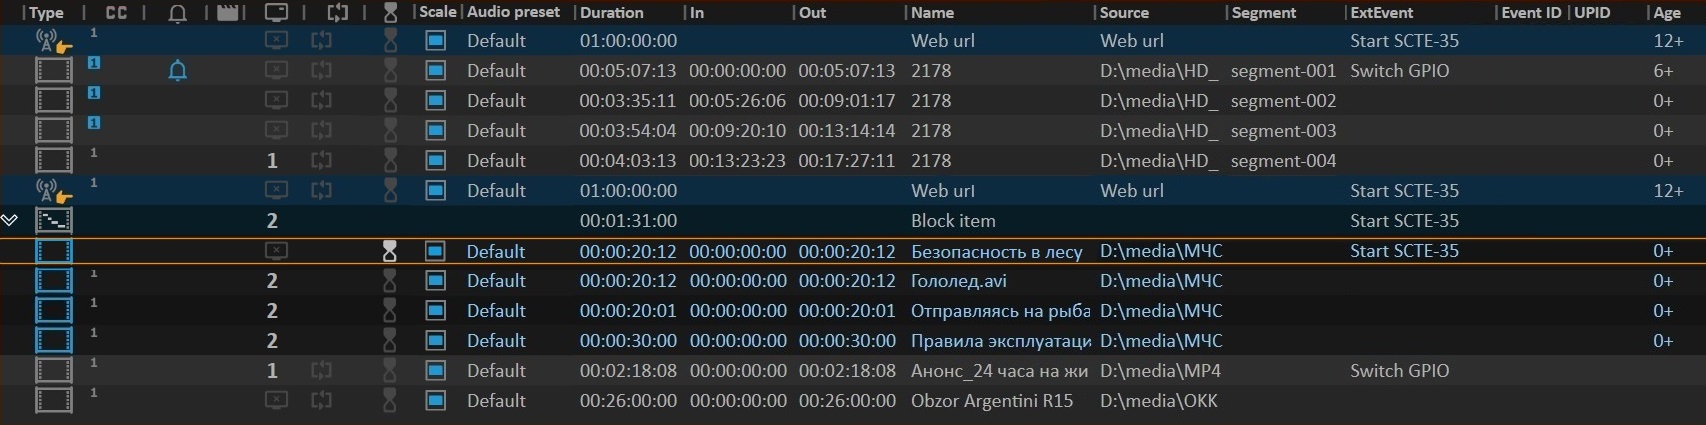
Full list of columns
| Column | Description |
|---|---|
| Type | Type icon (video file, block, Live) |
| CC | Subtitle tracks: gray — number of available tracks, light blue — files present |
| External event (🔔) | Simultaneous output of an external command is assigned |
| Item's scene | A GFX element is assigned |
| Logo slot | A logo is assigned |
| Playlist loop area | Looped playback (Playlist only) |
| Countdown | Countdown timer to this event (double-click to activate) |
| Scale | Scaling mode (LetterBox, Anamorph, Pan&Scan) |
| Audio preset | Assigned audio preset |
| Date & time | Date and time of going on air (Schedule only) |
| Fixed Time (icon) | Fixed start time (Schedule only) |
| Duration | Duration |
| In | Playback start timecode |
| Out | Playback end timecode |
| Name | Item name |
| Source | Path to the file on the server |
| Segment | Segment number (if the asset is divided into segments) |
| ExtEvent | Input external event (GPI/SCTE to control playback) |
| Event ID | Schedule item identifier |
| UPID | Unique program identifier for SCTE chapter/opportunity markers |
Color indication of schedule rows
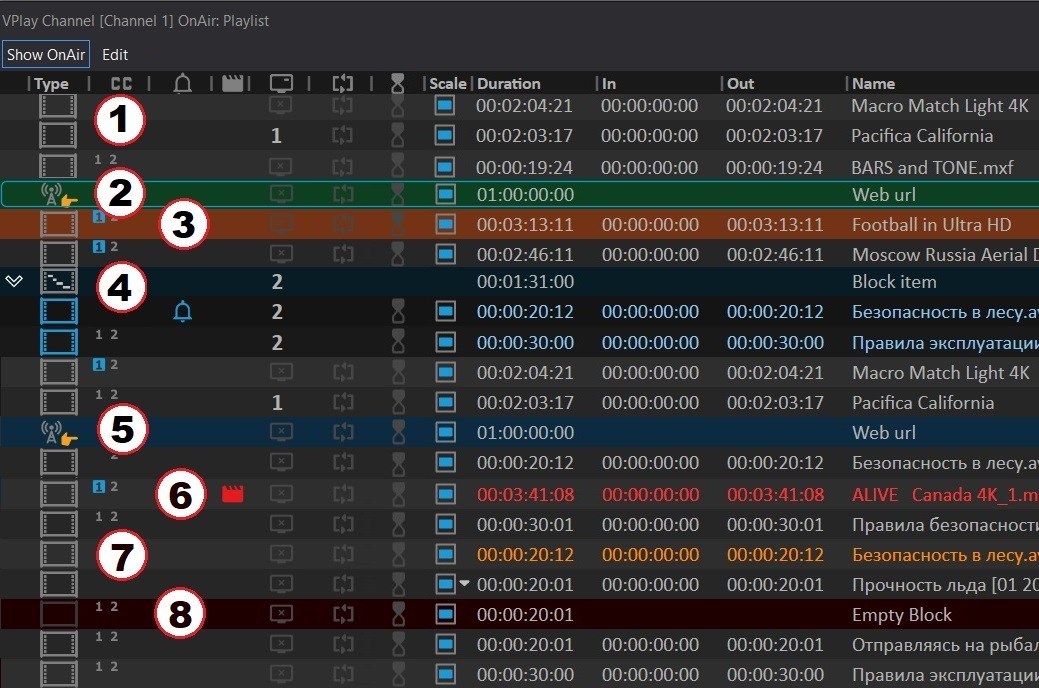
| Color | Meaning |
|---|---|
| ⬜ White | Regular item |
| 🟢 Green | Playing now |
| 🟫 Brown | Next item |
| 🔵 Blue | Block items |
| 🩵 Light blue | Live source (Live) |
| 🔴 Red | Critical error (file is missing/corrupted, inactive Live) |
| 🟡 Yellow | Warning (format mismatch — the item will be played and the broadcast will not be interrupted) |
| 🟥 Burgundy | Empty Block (an empty block with a set duration) |
Specific to Schedule mode:
- Underrun — unfilled time before Fixed Time (VPlay fills it automatically)
- Overrun — time exceeded before Fixed Time (manual correction is required)
Schedule Item Property window (Item Properties)
Introduced in VPlay 5.8. Displays the properties of the selected schedule item in a separate window.
For a primary event (clip, Live, Web URL)
Item info:
| Field | Description |
|---|---|
| Item type | Clip / Live / Web URL / Empty Block (read-only) |
| Media ID | Identifier (read-only) |
| Logo slot | Select a logo slot or No logo |
| Scale | LetterBox / Pan&Scan / Anamorph |
| Audio Preset | Audio preset (Default = from the channel settings) |
| External Event | Input control command (GPI, SCTE) |
Timecode:
| Field | Description |
|---|---|
| Fixed Time | Time-fixing checkbox (Schedule only) |
| Time Begin | Fixed start time (only with Fixed Time) |
| Clip Duration | Original file duration (read-only) |
| Timecode In | Playback start point |
| Timecode Out | End point (recalculated when Duration is changed) |
| Duration | Playback duration |
| Manual Exit | Mode of waiting for an external command before moving on to the next item |
User Tags: up to 10 custom tags.
For a secondary event (GFX scene)
Scene info:
| Field | Description |
|---|---|
| Layer | Overlay layer (1–8) |
| Name | Displayed scene name (does not rename the file) |
| Autostop | Stop the scene when the clip ends |
| Loop | Loop scene playback |
Timecode (relative):
| Field | Description |
|---|---|
| Offset Start Time | Scene start relative to the clip start |
| Offset End Time | Scene end relative to the clip end |
| Duration | Scene playback duration |
For an SCTE marker
Options SCTE:
| Field | Description |
|---|---|
| Program ID | Program identifier |
| Avail num | Ad slot identifier |
| Avail expected | Total number of slots in the program |
| Preroll time (sec.) | Time from the marker arrival to the splice event (4 s recommended) |
| Event ID | Event identifier |
| Auto increment | Automatically increment Event ID on each trigger |
| Auto return | Return to the main signal after the insert without waiting for SCTE Stop |
Item's Scenes window
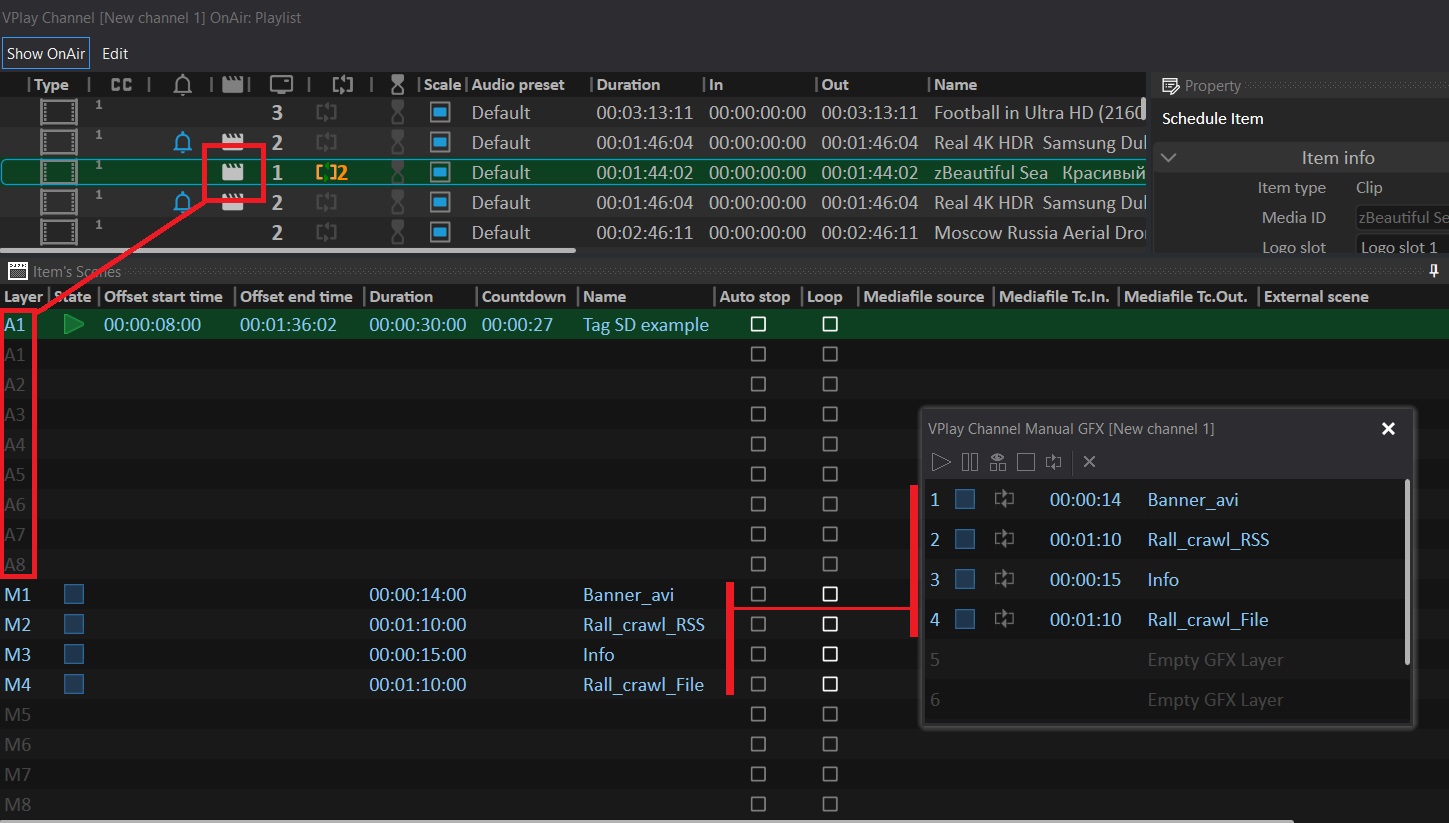
Up to 8 automatic graphics slots (A1–A8) + 8 manual slots (M1–M8).
Columns:
| Column | Description |
|---|---|
| Layer | Overlay layer (1–8) |
| Offset start/end time | Start/end time relative to the clip |
| Duration | Scene duration |
| Name | Scene name |
| Auto stop | Stop together with the clip |
| Loop | Loop |
| Mediafile source | Path to the scene file |
| Mediafile Tc.In/Out | Playback timecodes within the scene file |
Multiple scenes on one layer
You can place up to 8 consecutive scenes on one layer. Each following scene must start no sooner than 10 seconds after the previous one ends. If they overlap, both are highlighted in red.
Item's Output Events window

Up to 8 output control commands per schedule position.
The columns are similar to the SCTE fields in Item Properties (Offset start/end, Duration, Name, Program ID, Avail num, Avail expected, Preroll, Event ID, Auto return, UPID).
Channel Audio Ctrl window
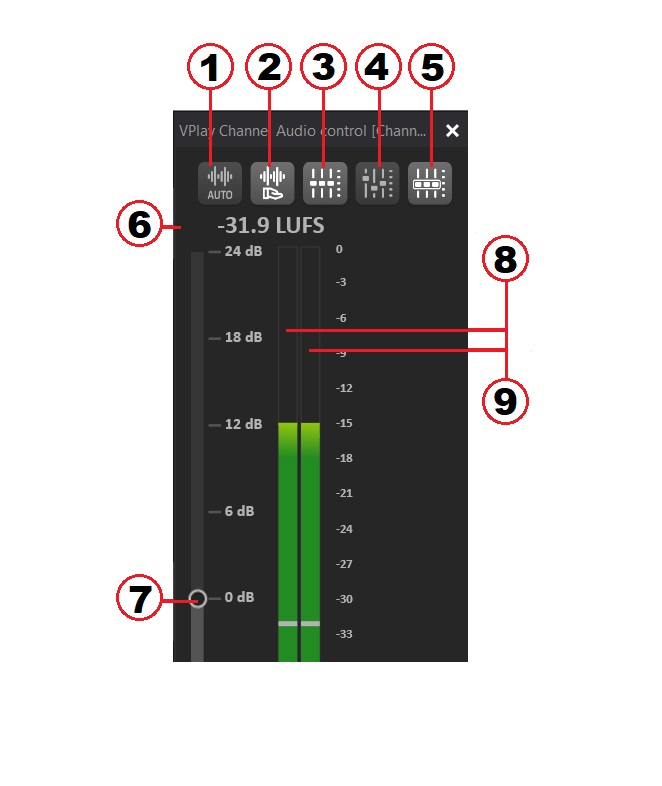
| Button | Function |
|---|---|
| Set enable auto audio gain (auto) | Automatic normalization — slider adjustment is unavailable |
| Set enable auto audio gain (manual) | Manual slider adjustment |
| Set normal gain for all | Reset manual settings, slider at 0 dB |
| Set gain edit for one stream | Manual adjustment for each stream separately |
| Set gain synchro for all streams | Synchronize the volume of all streams |
| Slider | Volume adjustment (in manual mode) |
| Indicator | Current volume level in LUFS |
| L/R scale | Visual sound level of the left and right channels |
Channel Logo Slot window
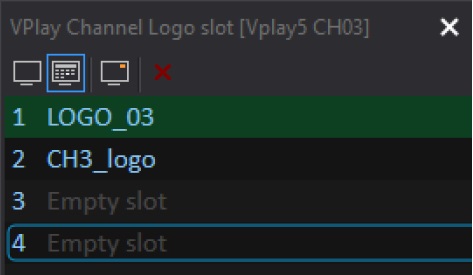
| Button | Function |
|---|---|
| Turn logo OFF | Turn the logo off |
| Logo by schedule | Default mode — the logo follows the schedule |
| Start selected logo | Turn on the logo from the selected slot |
| Clear selected logo slot | Clear the slot |
The active slot is highlighted in green.
Channel Manual GFX Ctrl window
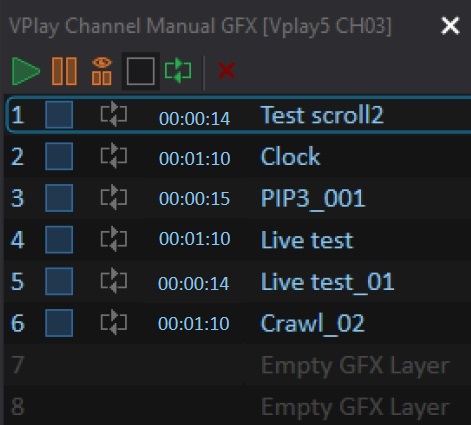
| Button | Function |
|---|---|
| Start selected | Start the selected scene |
| Pause selected | Pause + hide the scene |
| Pause selected and set visible | Pause + keep the freeze frame visible |
| Stop selected | Stop the scene |
| Set Loop mode | Loop playback |
| Remove selected | Remove the scene from the slot |
Slot table (8 positions): slot number, status (Play/Stop/Pause), loop indicator, time progress bar, scene name.
Channel Auto GFX Ctrl window
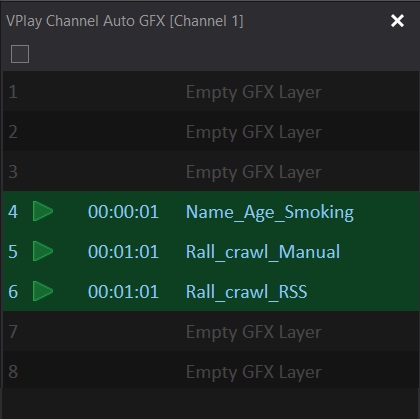
Monitoring of automatically active scenes. The only function is forced stop with the Stop selected auto GFX button.
Columns: number, status, duration, scene name.
Manual Events Ctrl window
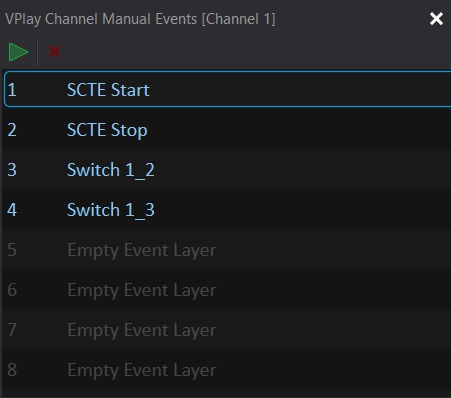
Manual output of control commands outside the schedule. Up to 16 commands at the same time.
Adding commands: drag and drop from the resource tree (Events or Plugins) into the window.
Running: select a command and click Play.
Channel Player window
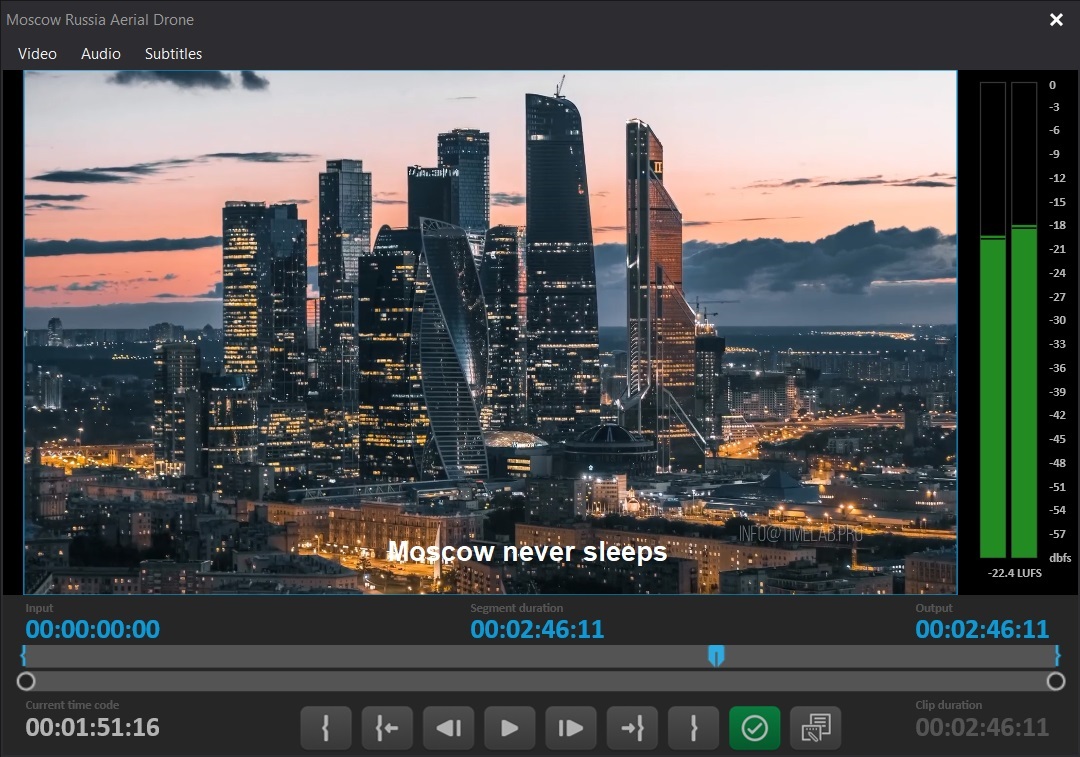
A video player for preview, timecode editing, and segmentation.
Important: segments are saved to PAM only when the player is opened from Source Content Browser (from storage), not from the schedule.
Player control buttons

| Button | Function |
|---|---|
| Set marker Tc In | Set the start marker |
| Go to marker Tc In | Go to the start marker |
| Step previous/next | Previous/next frame |
| Play | Playback |
| Go to marker Tc Out | Go to the end marker |
| Set marker Tc Out | Set the end marker |
| Apply changes to item | Apply the timecode changes |
| Enable Multi Segment Mode | Switch to segmentation mode |
Segmentation mode

| Button | Function |
|---|---|
| Apply changes to item | Save segments to PAM (only from Source Content Browser) |
| Add new segment | Add a segment |
| Remove Current Segment | Delete the segment |
| Split Current Segment | Split the segment into two |
Timecode indicators
| Indicator | Meaning |
|---|---|
| Input | Start timecode (Trim In) |
| Segment duration | Fragment duration |
| Output | End timecode (Trim Out) |
| Current time code | Current playback position |
| Clip duration | Full file duration |
Command Control window
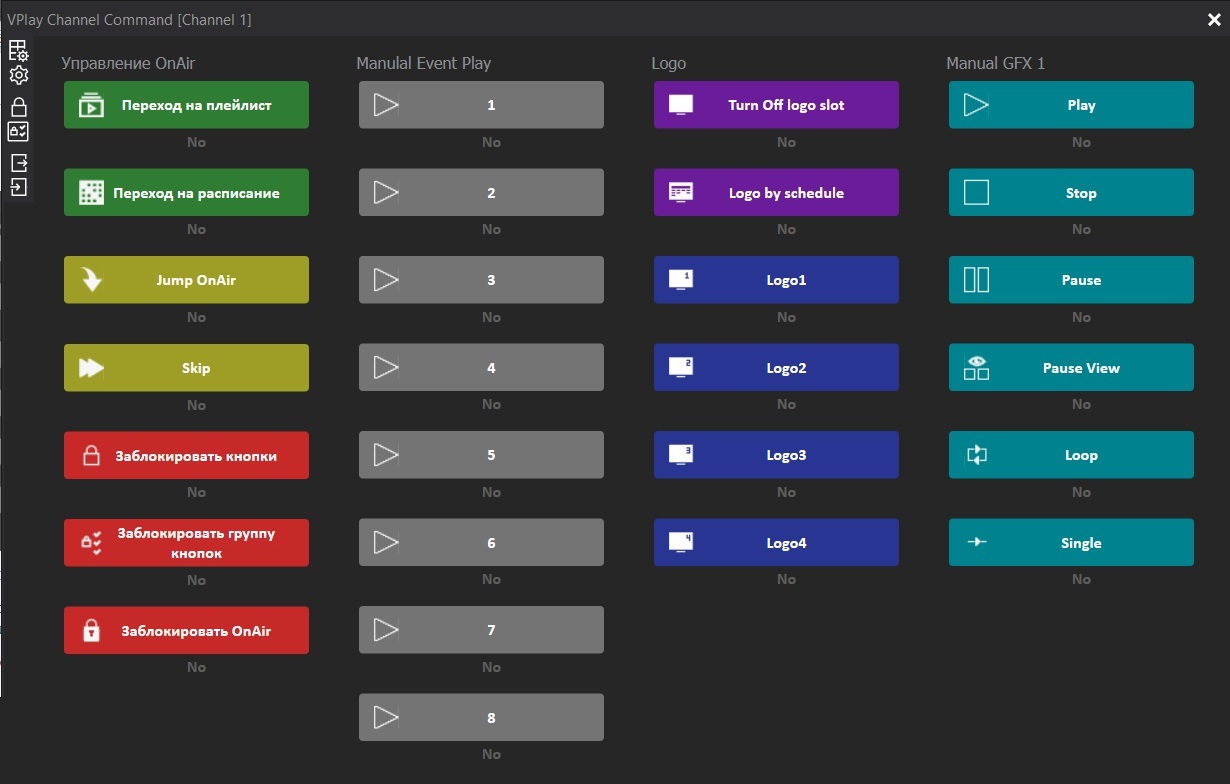
A configurable quick commands panel. It can be moved to a separate touchscreen.
Creating a layout
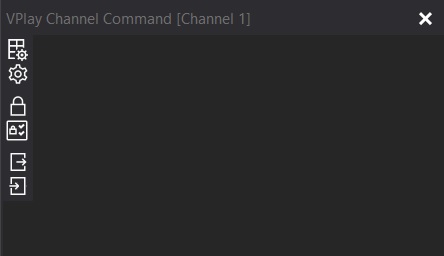
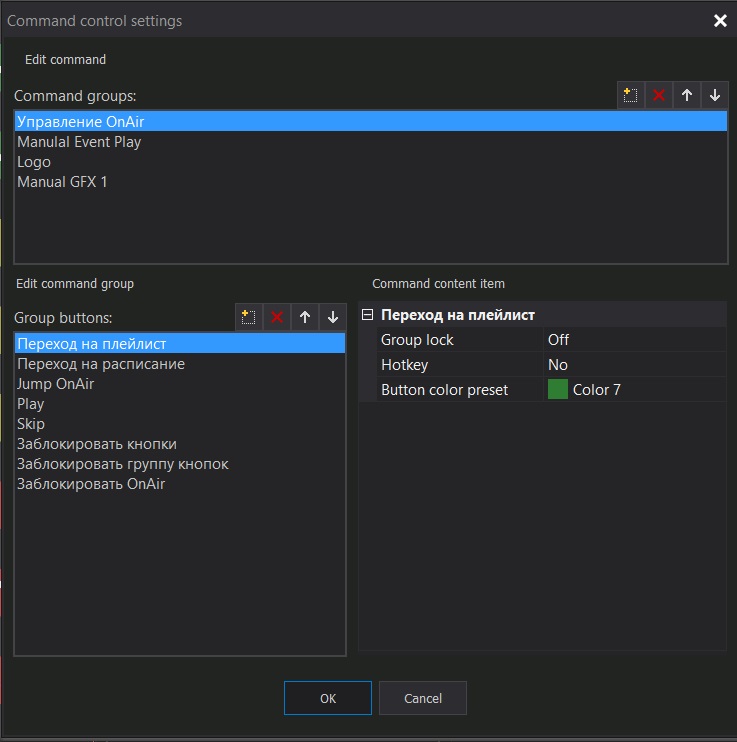
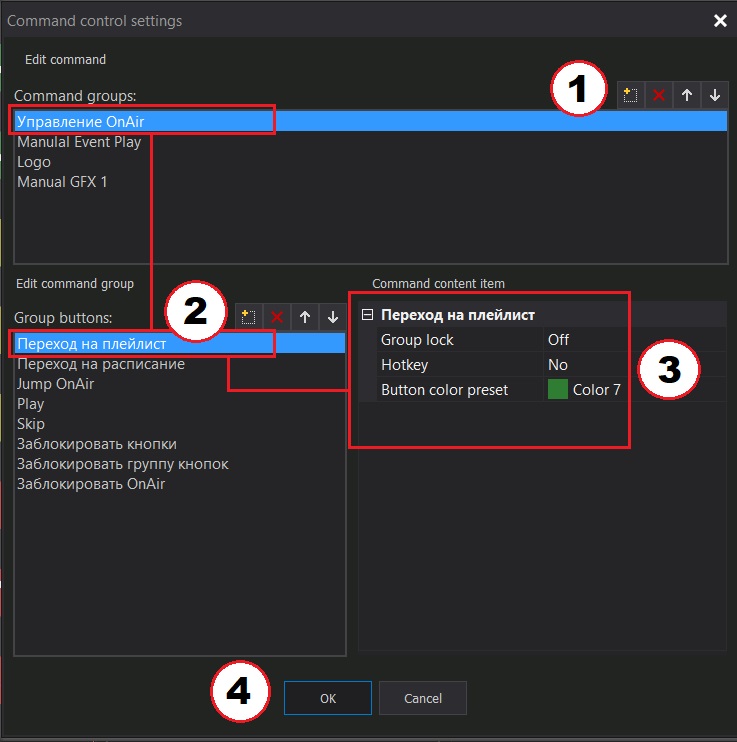
- Show settings dialog → the Command control settings window
- In the Edit command block, create button groups (New/Delete/Move Up/Down)
- In the Edit command group block, add buttons inside the group
- In the Command content item block, set the button color (Button color preset), the hotkey (Hotkey), and the group lock flag (Group lock)
- OK → the layout is created
Assigning actions to buttons
- Set or unset editor mode — gear icons appear on the buttons
- Click a gear icon and select an action:
| Action type | Available functions |
|---|---|
| OnAir | CUE, SKIP, Switch to Playlist/Schedule, A/B switching (redundancy) |
| Manual event play | Output a command from the Manual Events window (1–16) |
| Logo slot control | Turn off / By schedule / Slot 1–16 |
| Manual GFX 01-08 | Play / Stop / Pause / Pause+View / Loop / Single for each slot |
| Group Lock | Lock select / Lock all / Lock OnAir |
| Command button property | Color and lock flag only |
- Click Set or unset editor mode again to exit editing mode
Exporting/importing a layout
- Export current command layout to file — save the layout to
*.xml - Import and change current command layout from file — load a layout (the current one will be deleted!)
Schedule Editor window
An additional window for preparing schedules and playlists in advance without the risk of errors on the active air.
It supports opening several schedules at once as tabs (Edit windows). Navigate using the tab headers.
Open a schedule: in the resource tree → Channel Programming → Schedules → right-click → Open for edit.
All schedule files
Schedules are stored on the server in *.xml format in the channel's Schedules folder. Playlists are stored in the Playlists folder. Manual editing of the XML files is prohibited.
Countdown window
A countdown timer to the selected event in the schedule.
Activation: double-click in the Countdown column on the required schedule row → the hourglass icon turns white → open the Countdown window.
If several timers are active, the nearest one in time is shown. After it fires, the window automatically switches to the next one.
Search window (advanced search)
View → Search — search across the entire schedule with filters on any column (name, timecode, status, tags, etc.).