Scene Editor
Scene Editor is the built-in VPlay graphics editor for creating on-air graphics. All scenes are saved in the *.vpScene format and become available in Channel Manager immediately, without restarting the system.
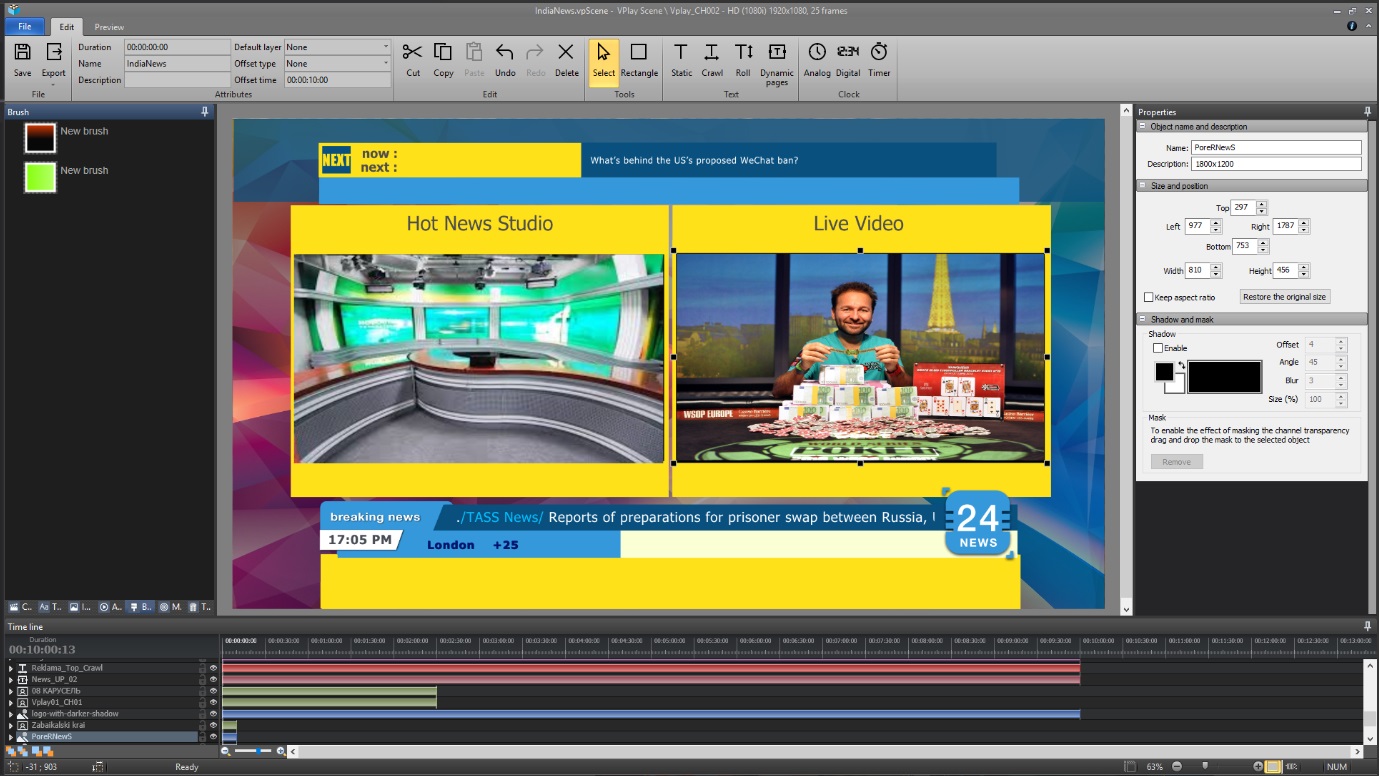
Launch it from VPlay Launcher: the Scene Editor button.
Concept: scenes and logos
VPlay distinguishes two types of graphic elements:
| Type | Timing | Layers | Behavior |
|---|---|---|---|
| Scene | Independent duration | Up to 8 layers | Can be longer than the clip; loops or plays once |
| Logo | Equal to the clip duration | Top layer | Always on top of scenes; loops if shorter than the clip |
A scene can continue after the current clip ends and overlap the next one. A logo is always bound to its own schedule item.
Object types
Rectangle
The basic object for backgrounds, banners, and dividers. Supports solid color fill, gradient, transparency, rounded corners, and border.
Image
A static image: PNG, TGA, BMP with alpha channel (transparency) support. Ideal for logos and icons.
Static Text
Text with fixed content. Supports font, size, color, shadow, outline, and alignment.
Crawl
Horizontal text scrolling. Content sources:
- Manually entered text
- RSS feed (automatic updates)
- Metadata from the schedule
Configurable parameters: speed, direction (left to right / right to left), separator between messages, pause.
Roll
Vertical text scrolling — for end credits and lists. Speed and direction are configurable.
Clock
Displays the current time. Modes: analog and digital. Format, time zone, and synchronization with the VPlay NTP server.
Timer
Count-up or countdown. Start: manually from Channel Manager or automatically when a schedule item starts.
PIP (Picture-in-Picture)
A live source on top of the broadcast: SDI input, NDI, IP stream. Position, size, and shape (including masks) are configured in Scene Editor.
Dynamic pages
An object for displaying complex structured data: weather, stock quotes, news blocks. Data is loaded from RSS or external sources.
Clip metadata in graphics
Scenes can display information about the current and next schedule items in real time — with no manual updates.
Built-in tags
<text="name"/>        — name of the current clip
<text="next_name"/>   — name of the next clip
<text="duration"/>    — duration of the current clip
<text="time_left"/>   — remaining playback time
Custom tags
In the Content Property of each file, you can set arbitrary metadata (author, rating, description, language). In Scene Editor, these fields are available through custom tags and are substituted automatically during playback:
<text="user:author"/>
<text="user:rating"/>
Layers and stacking order
Each scene contains several layers. Objects within a single scene are stacked in layer order: the top layer is above all the others.
There is also a hierarchy between multiple scenes on a channel: the GFX layer number (1–8) is set in Channel Manager. A scene on layer 8 is always above a scene on layer 1. The logo is always above all GFX layers.
Animations
For each object in a scene, you can set an in animation and an out animation:
- Fade — smooth fade in/out
- Slide — slide in from a side (bottom, top, left, right)
- Scale — scale up from zero
- Custom — keyframes with arbitrary parameters
Animation duration is set in milliseconds.
Fill+Key
VPlay supports professional Fill+Key output for integration with hardware video switchers:
- Fill — the color graphics signal
- Key — the mask (alpha channel) used for mixing
Fill+Key output is configured on an SDI card (Blackmagic, AJA) or through NDI. It is used in studio systems where VPlay acts as a graphics processor for an external switcher.
Workflow
Creating a scene
- In Scene Editor: File → New Scene
- Set the resolution (it must match the channel format: HD 1920×1080, SD 720×576, etc.)
- Add objects from the toolbar
- Configure the properties of each object in the Properties panel
- Set animations (Animation tab)
- Save: File → Save → the
*.vpScenefile is saved to the channel storage
Using a scene in the schedule
- In Channel Manager, select a schedule item
- Open the Item's Scenes window
- Click Add Scene → select a
*.vpScenefile from the library - Set the start time (relative to the clip start) and the duration
- If needed, enable Loop (looped playback) or Auto Stop (stop together with the clip)
Controlling scenes manually
In the Channel Manual GFX Ctrl window → select a scene from the list → Start / Stop.
Typical uses: lower thirds during interviews, breaking-news banners, manual launch of promos.
Converting external graphics
VPlay works only with the *.vpScene format. If you have ready-made graphics in other formats (PSD, AI, PNG sequences), you need to convert them:
- Static images (PNG, TGA) — used directly as an Image object inside a scene
- Animated graphics — imported as a PNG sequence or recreated in Scene Editor
For detailed instructions, see VPlay. Practical Guide. Launching a Broadcast Channel.